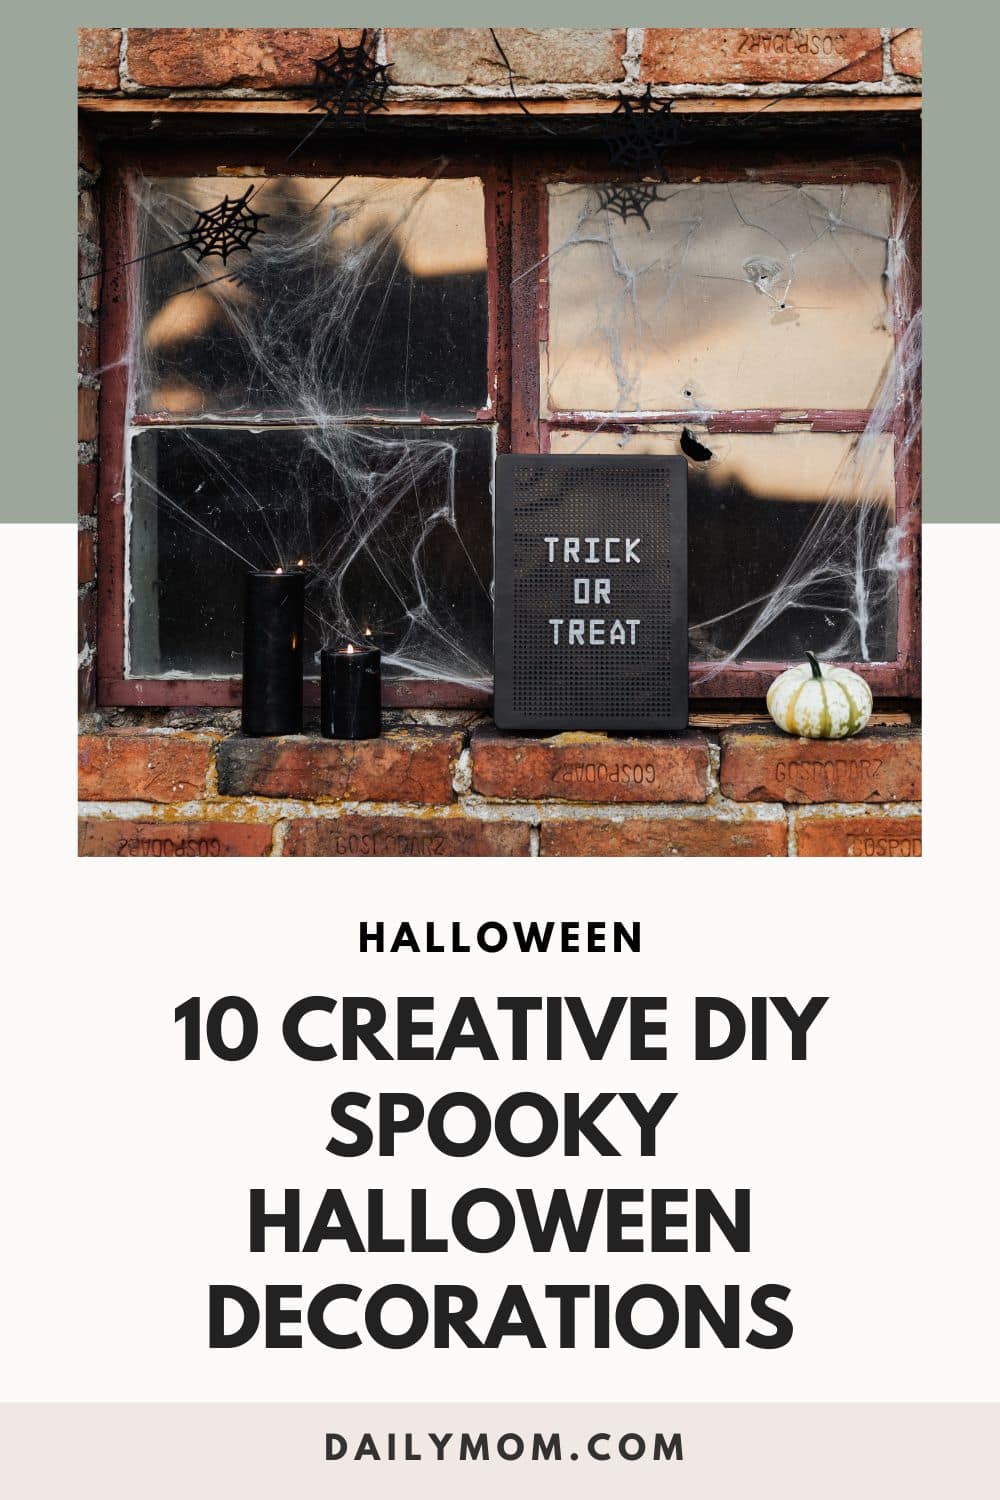
Get ready to dive headfirst into the realm of spooky Halloween decorations – where ordinary homes get a dose of spooky and a sprinkle of DIY charm. As the calendar flips closer to October, there’s this electric buzz in the air – the kind that makes you want to grab a pumpkin spice latte in one hand and a glue gun in the other. If you’re anything like me, you can practically taste the crisp air and imagine the thrill of turning your place into a Halloween haven.
But here’s the twist: DIY is where the real magic happens for spooky Halloween decorations. Forget store-bought stuff; we’re all about getting our hands dirty – or glittery, if you prefer. Those pumpkins? They’re not just pumpkins anymore; they’re blank canvases waiting for your artistic touch. And cobwebs? They’re like your personal art installation that comes with extra spookiness. DIY spooky Halloween decorations are like the secret sauce that adds that extra kick of personality and creativity to your space.
And let’s not ignore the fact that Halloween is the ultimate kickoff to the holiday season. It’s like the first chord of a festive symphony that’s about to play. With every pumpkin you carve and every ghost you hang, you’re setting the stage for months of celebration, warmth, and the joy of being together with friends and family.
Read More: Christmas Arts and Crafts to Create Holiday Cheer this Year
So let’s grab our crafting supplies and channel our inner Martha Stewart (with a dash of Tim Burton, of course). The pages ahead are loaded with DIY ideas for spooky Halloween decorations that are going to turn your place into the ultimate Halloween hangout. Let’s make this season a blend of creative chaos and spooky chic – where every skeleton decoration and pumpkin spice-scented candle adds to the epic tale of our lives.
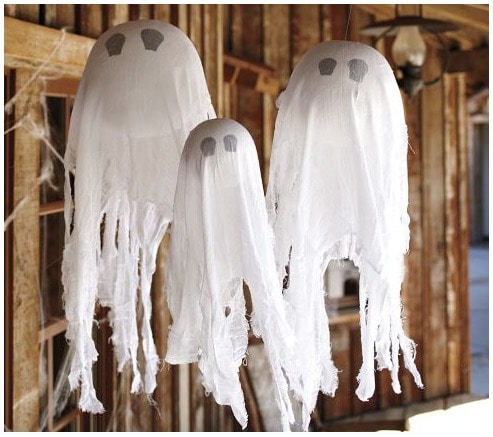
Eerie Elegance with Floating Ghosts
Ready to conjure up some ghostly elegance? Let’s dive into creating spooky Halloween decorations like these floating ghosts that’ll send shivers down your spine – in the most stylish way possible. Here’s a step-by-step guide to crafting these ethereal specters that will haunt your home with a touch of DIY charm.
Materials You’ll Need:
- White balloons (preferably large-sized)
- White cheesecloth or gauzy fabric
- Clear string or fishing line
- Scissors
- Black felt or adhesive googly eyes
- Glue
Step 1: Inflate the balloons to your desired size. The bigger, the better for a dramatic effect.
Step 2: Cut the cheesecloth or gauzy fabric into large square pieces, around 4 feet by 4 feet. The irregular edges add to the ghostly vibe.
Step 3: Drape a square piece of fabric over each inflated balloon. Position it so that the fabric drapes down like a flowing ghostly robe.
Step 4: Once you’re happy with the placement, use the clear string or fishing line to tie the fabric securely around the balloon’s neck. Leave a bit of excess string to hang the ghost.
Step 5: Now, the fun part – giving your ghosts some personality! Attach googly eyes or cut out eyes from black felt and glue them onto the fabric.
Step 6: Find the perfect spots to hang your floating phantoms. Indoors, they can grace your entryway or loom over a party spread. Outdoors, let them dance in the wind on your porch or under a tree.
Step 7: Hang the ghostly creations using the clear string or fishing line. Make sure they’re secure and floating a few feet above the ground for that ethereal effect.
Pro Tips:
- Consider varying the sizes of the balloons and fabrics for a more dynamic display.
- Illuminate your floating ghosts with soft, colored lights for an eerie glow after dark.
- If you’re hanging them outside, make sure they’re well-anchored to withstand wind.
So, listen up – these floating ghost decorations? Total game-changers. They’re not just your regular spooky Halloween decorations; they’re all about bringing that hauntingly elegant vibe to the scene. We’re talking mystery and grace rolled into one, making your Halloween setup legit stand out.
Whether they’re making your living room look like a ghostly ballroom or setting the tone for some epic trick-or-treating on your porch, these DIY phantoms are here to make your crib the ultimate hotspot this Halloween. Get ready to own the spookiest, most elegant house on the block – it’s the season to be wickedly awesome with these spooky Halloween decorations, after all.
Haunted Mason Jar Lanterns
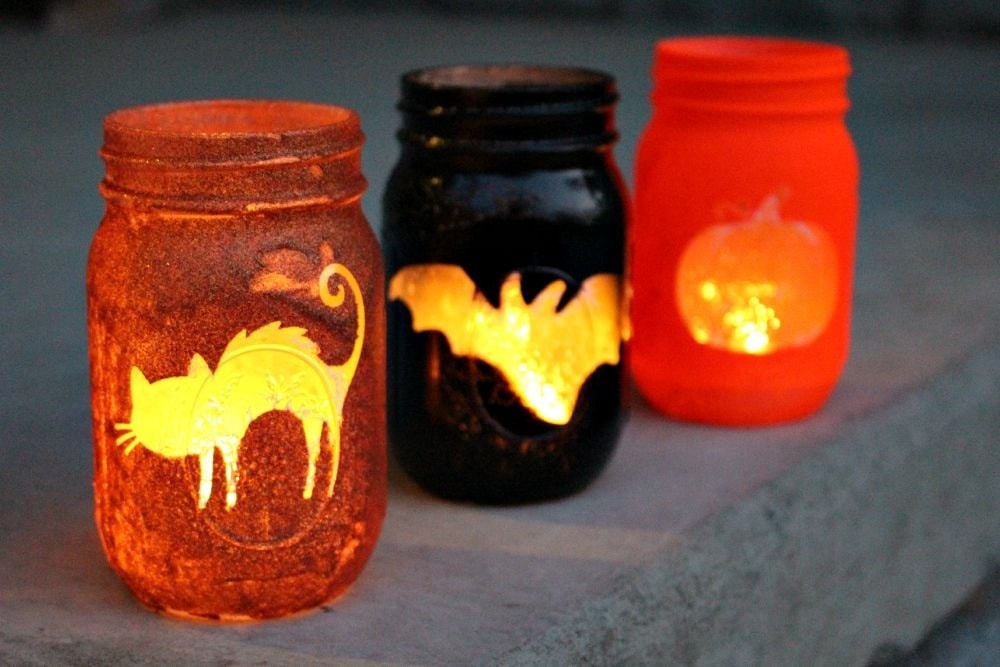
Get ready for some serious DIY magic – we’re taking plain old mason jars and turning them into the most enchanting lanterns that’ll seriously level up your spooky Halloween decorations. This is all about that adventure of crafting, where you’re about to cast this mesmerizing glow on your decor. Get ready to unveil the secrets of making these lanterns that’ll add that perfect touch of spooky charm to every nook and cranny of your space. Let’s dive in and discover how to create these illuminators that are a total game-changer in the world of eerie awesomeness.
Step 1: Gather your materials – mason jars of various sizes, acrylic paints in haunting hues like black, dark purple, or deep orange, paintbrushes, adhesive googly eyes, black lace or gauzy fabric, and battery-operated tealights.
Step 2: Start by giving your mason jars a base coat of paint. Choose a color that sets the tone – maybe a deep black for a classic spooky vibe or a mysterious dark purple for an elegant touch.
Step 3: Once the base coat dries, let your creative spirit run wild. Use acrylic paints to add creepy motifs like bats, spiders, or gnarled trees. If you’re feeling artsy, paint silhouettes of haunted houses or witches on broomsticks.
Step 4: To enhance the eerie charm, add adhesive googly eyes to the jars. They’ll give your lanterns a playful yet unsettling appearance, as if they’re watching your every move.
Step 5: For an extra touch of gothic elegance, glue black lace or gauzy fabric around the neck of the jars. It’s like dressing them in ghostly attire.
Step 6: Pop in battery-operated tealights to bring your lanterns to life – without the risk of actual flames.
Ideas for Where to Use Them:
- Table Centerpieces: Line your dining table with these spellbinding lanterns for a bewitching dinner party ambiance.
- Outdoor Path Lights: Place these lanterns along your garden path or porch steps to guide trick-or-treaters with a ghostly glow.
- Haunted Mantel: Arrange a collection of lanterns on your mantel for a dramatic and mysterious focal point.
- Creepy Window Display: Line your windowsills with these lanterns to create a shadowy silhouette that’ll intrigue passersby.
Whether they’re setting the mood for your dinner shindig or lighting up the path for candy-hunting squads, these lanterns are the real deal when it comes to spooky Halloween decorations. Trust me, your space is about to get an artsy, spooky upgrade that’s all about embracing the season with a seriously creative twist.
Mummified Doorway Entryway
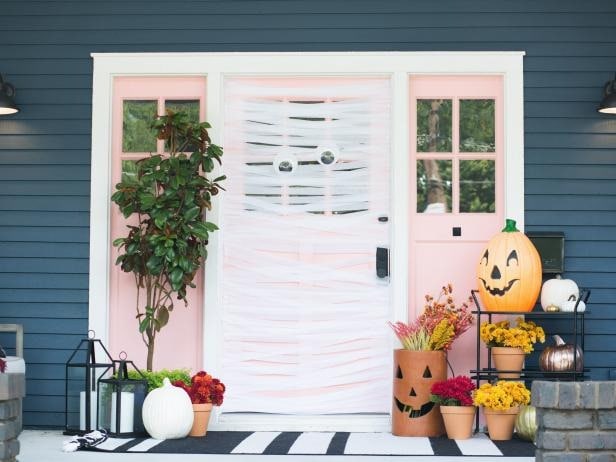
Get ready to take that basic doorway and turn it into a mummy’s ultimate hangout – we’re talking wrappings that’d make ancient pharaohs straight-up jealous. This is all about kicking up your Halloween game with some major creativity. Imagine your guests walking into a full-blown mummy’s lair – it’s like giving them a sneak peek into the spooky awesomeness that’s waiting inside. So, let’s dive into how you can pull off these spooky Halloween decorations with mummy wrap that are gonna seriously make your haunt stand out.
Step 1: Gather your materials – white gauzy fabric or cheesecloth, double-sided tape, googly eyes, and clear string or fishing line.
Step 2: Start at the top of your doorway. Attach one end of the gauzy fabric to the door frame using double-sided tape. Let the fabric drape down to the floor. This will be the first “layer” of your mummy.
Step 3: Continue attaching the fabric at different angles to create a crisscrossing pattern, like a mummy’s wrappings. Be sure to leave gaps here and there to create an authentic, unraveling effect.
Step 4: Secure googly eyes to the fabric at various points. These will give your mummy a playful yet eerie touch.
Step 5: As you work your way down the door frame, allow the fabric to puddle at the bottom to mimic the look of unraveled bandages.
Step 6: For a finishing touch, add eerie lighting. Hang string lights or battery-operated candles behind the fabric to cast a haunting glow.
Step 7: To up the spookiness, add spiderweb accents to the corners of the doorway. It’s like your mummy’s lair is home to some eight-legged residents.
Extra Tips:
- If you’re feeling particularly adventurous, you can strategically attach small toy spiders onto the fabric for an extra creepy effect.
- For a more dramatic entrance, place an Egyptian-style “Welcome” sign at the center of your doorway.
Now throw in some moody lighting and a few spiderweb accents, and you’ve got captivating spooky Halloween decorations that are pure gold. As your friends walk through this mummy’s lair, they’re stepping into this realm where the living and the afterlife kinda mingle. It’s like creating a Halloween experience that’s gonna be etched in memory – seriously, your party just hit epic status.
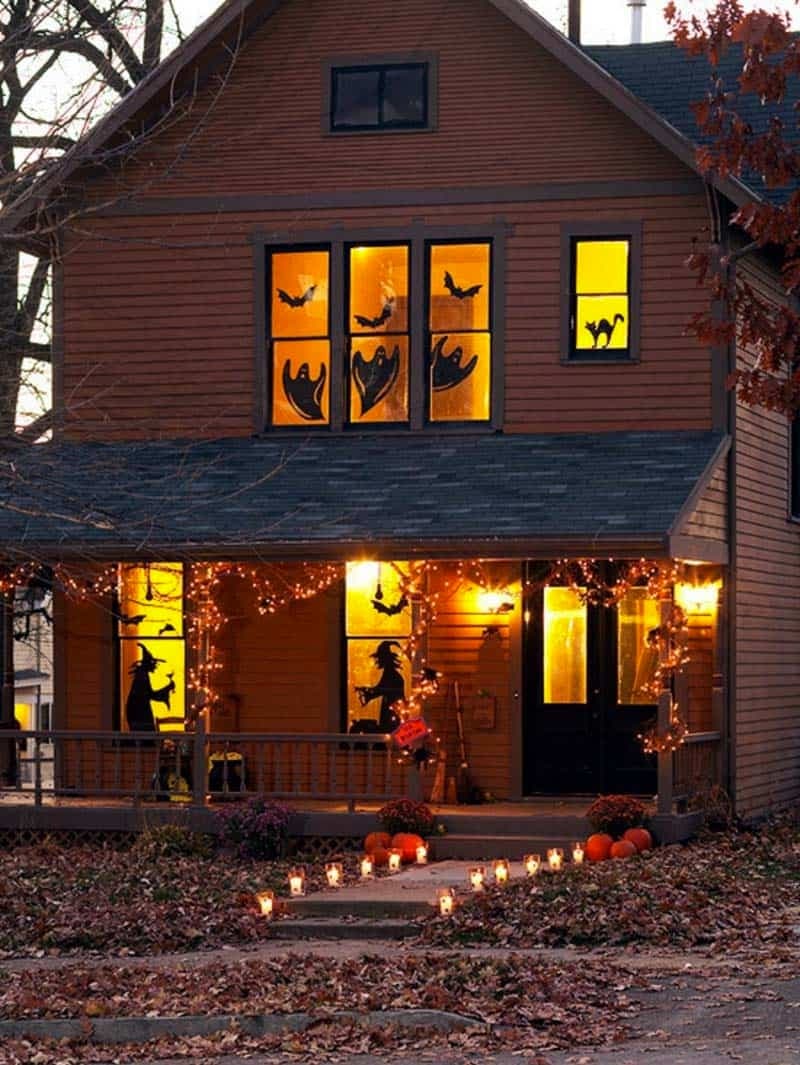
Spooky Silhouettes: Window Shadows
Get ready to give your windows a serious spooky upgrade with some haunting silhouettes that are gonna make everyone do a double-take. It’s like transforming your windows into these eerie portals that’ll give off major chills. Think classic yet seriously captivating spooky Halloween decorations– this is all about adding that mysterious edge to your Halloween game. So, let’s dive into this art of creepiness and uncover how you can whip up your very own set of spine-tingling cutouts that’ll give your place that magical, enchanting vibe. Ready to get into the eerie artistry of spooky Halloween decorations? Let’s do this!
Step 1: Choose your spooky silhouettes – witches on broomsticks, bats in mid-flight, haunted houses against a moonlit sky – the possibilities are endless.
Step 2: Gather your materials – black paper or cardboard, scissors, and double-sided tape.
Step 3: Find templates online or sketch your own designs onto the black paper. Keep the shapes simple and bold for maximum impact.
Step 4: Carefully cut out your chosen shapes. Precision isn’t key here – the jagged edges and imperfections add to the eerie allure.
Step 5: Attach your cutouts to the inside of your windows using double-sided tape. Position them so that they’re visible from the outside, creating an ominous tableau for passersby.
Step 6: As dusk falls, the real magic begins. Turn on interior lights to cast the silhouettes against the glass. The contrast of black cutouts against the warm glow is where the spooky charm truly comes to life.
Templates and Tips:
- Witches: Position them mid-flight, broomstick and all, for a touch of classic Halloween whimsy.
- Bats: Create a swarm of bats taking flight, giving the illusion of a nocturnal rendezvous.
- Haunted Houses: Design haunted houses with crooked chimneys and eerie windows, transporting your viewers to a ghostly realm.
Don’t let the simplicity fool you – we’re talking about using basic stuff like black paper or cardboard, but the result? Total game-changer for spooky Halloween decorations. It’s all about that contrast between the cutouts and the cozy inside of your crib that creates this epic show that screams Halloween vibes. So, get ready to let your creative juices flow as you cut and tape, making your windows tell a spooky tale.
These silhouettes? They’re not just spooky Halloween decorations; they’re like this invitation for anyone with a wild imagination to step into a world where shadows are alive and kicking. It’s like creating your very own portal to the eerie unknown, and trust me, it’s gonna be wicked.
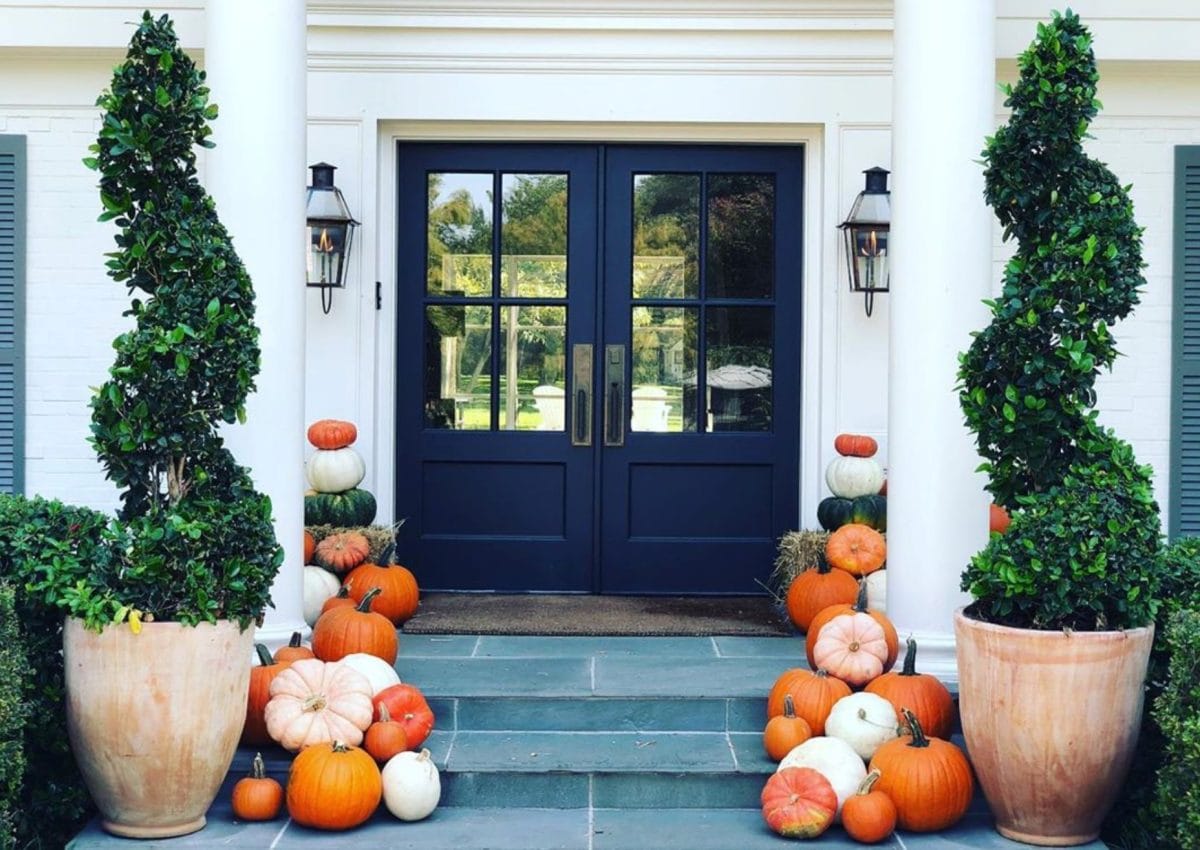
Pumpkin Patch Porch Display
Get ready to take your porch from zero to pumpkin hero with a display that screams Halloween vibes. Let’s talk about curating your own mini pumpkin patch that’s not only cute but Insta-worthy too. If you’re anything like me, you’re all about that perfect mix of nature and creativity, and that’s exactly what we’re going for here for these spooky Halloween decorations.
Step 1: First things first, gather your loot – real pumpkins in all shapes and sizes, some faux ones that’ll stay fresh all season, and a few hay bales for that rustic touch.
Step 2: Now, it’s time to set the stage. Stack those hay bales to create levels, giving your pumpkins the perfect platform to shine.
Step 3: Grab your real pumpkins and start arranging them. Mix it up – big ones, small ones, and everything in between. It’s like creating a pumpkin family reunion right on your porch.
Step 4: Add those faux pumpkins for some extra flair. They’re like the VIP guests that’ll hang around long after Halloween is over.
Step 5: Don’t forget the scarecrows! Place them casually around your pumpkin patch, like they’re your quirky neighbors joining in on the fun.
Step 6: When the sun goes down, it’s time for the lanterns to shine. Tuck battery-operated candles into them, and watch your porch turn into a cozy haven with a touch of spooky charm.
Step 7: Finish off the scene with Halloween-themed accessories – spiderwebs, plastic spiders, maybe even a skeleton chilling on a hay bale.
Cool Ideas to Try:
- Craft a pumpkin pyramid by stacking them on the hay bales, creating a mini pumpkin mountain.
- Turn the hay bales into seating, making your porch the ultimate hangout spot for fall selfies.
- Got a nook? Turn it into a pumpkin corner with hay bales as benches and pumpkins all around.
This pumpkin patch display isn’t just about spooky Halloween decorations; it’s about setting a vibe. The mix of real and faux pumpkins, the laid-back charm of hay bales, and the added touch of lanterns and scarecrows create a porch scene that’s both welcoming and super festive. So, grab your pumpkins, throw in some hay, and let your porch become a photo-worthy wonderland where the magic in these spooky Halloween decorations comes alive – a display that not only wows your friends but also makes your porch the ultimate fall hangout spot.
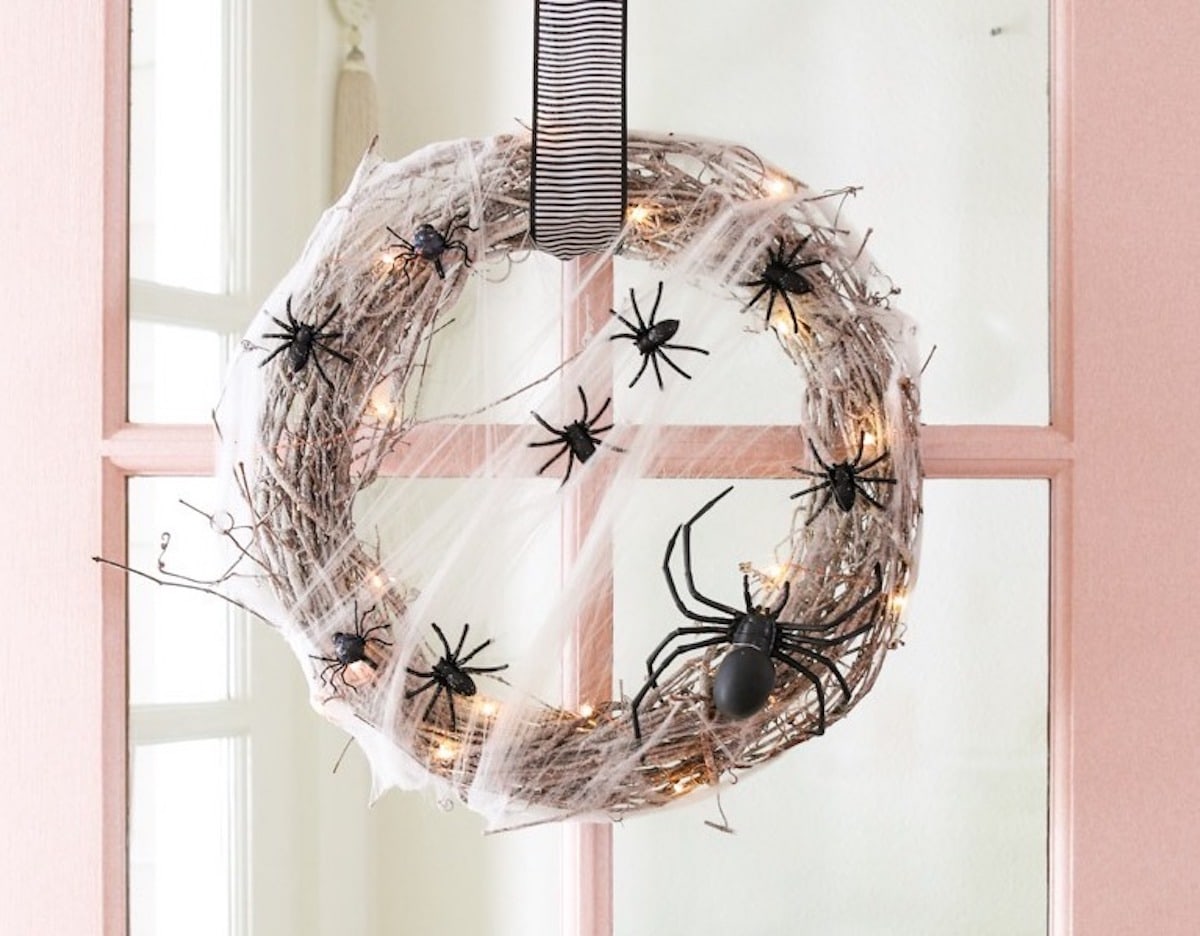
Creepy Crawly Wreath
Time to give your door a makeover that screams “Halloween vibes, here we come!” Let’s talk about crafting a wickedly cool wreath that’s not just welcoming but also totally creepy with a bunch of crawly creatures. Imagine opening your door to a wreath that’s like, “Hey, come in if you dare.” Here’s how you can create these spooky Halloween decorations that’ll have everyone talking.
Step 1: Round up your stuff – a plain wreath base (you can find these at craft stores), fake spiders of all sizes, cobwebs to create that haunted look, plastic bugs like beetles and centipedes for that extra “ick” factor, and some black ribbon.
Step 2: First, let’s add those cobwebs. Stretch them around the wreath base to give it that eerie, haunted vibe. You know, like the entrance to a spooky mansion.
Step 3: Now, the fun part – it’s spider time! Arrange those fake spiders and plastic bugs all around the wreath. Let ’em hang out in the cobwebs, crawl along the edges, or just chill in the center.
Step 4: Get creative with the placement. Make it look like your wreath is crawling with these critters, giving your guests a friendly little scare as they approach.
Step 5: Once you’ve nailed the setup, use hot glue or craft wire to make sure those critters stay put.
Step 6: Hang your masterpiece using a black ribbon. It’s not just for hanging; it’s like the finishing touch that ties your whole Halloween aesthetic together.
Why Your Door Needs a Creepy Wreath:
So, let’s break it down – a wreath isn’t just another one of those spooky Halloween decorations. It’s like your door’s way of saying, “Guess what? Halloween is happening here!” When you craft a wreath that’s crawling with all these creepy crawlies, you’re setting the scene for what’s inside. It’s like giving everyone a sneak peek of the spooky adventure they’re about to step into.
Spiders and bugs on your wreath? It’s a conversation starter, a thrill generator, and basically, the ultimate way to show off your Halloween spirit. So, whether you’re aiming to spook or just add a touch of eerie charm, this wreath is how you declare to the world that you’re ready to dive into a season of hauntingly good fun.
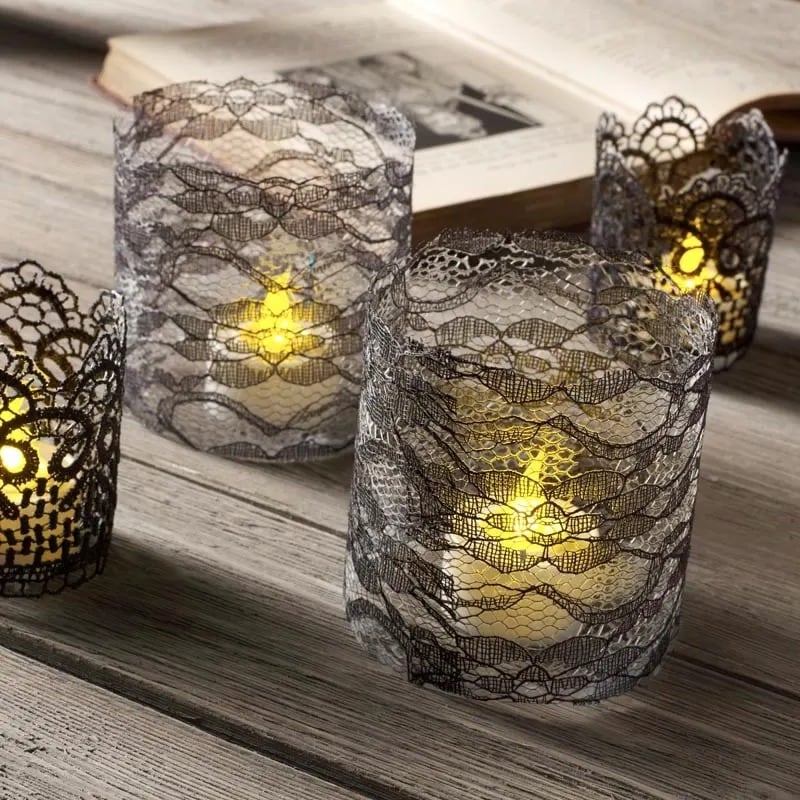
Glamorous Gothic Candle Holders
Ready to bring some spooky sophistication to your Halloween setup? Let’s talk about creating candle holders that are half elegant dinner party and half haunted mansion. It’s all about that sweet spot between fancy and creepy, where you get the best of both worlds. Imagine the cool vibe of candlelight dancing through lace – it’s like setting the scene for a chill night with a touch of mystery. Here’s the scoop on how you can make these spooky Halloween decorations that are both chic and spook-tacular.
Step 1: Gather your stuff – glass candleholders (you know, the ones that hold your fave scented candles), some black lace (snag it from a fabric store or thrift shop), metallic paint in gold or silver (for that touch of glam), and a paintbrush.
Step 2: Start by cutting up the black lace into pieces that can wrap around your glass candleholders. Don’t worry about getting it perfect – the uneven edges and a bit of fraying add to the cool vibe.
Step 3: Now comes the artsy part – brush on that metallic paint. Hit the edges and get artsy with some random spots. This is where the chic factor comes in, giving the lace a pop of contrast against the darkness.
Step 4: Wrap the lace around the candleholders and secure it with a bit of glue. Instant transformation – your plain glass holder is now a canvas for awesome shadows and textures.
Step 5: Light those candles up and get ready for the show. As the flames flicker, they’ll send shadows through the lace, creating this rad pattern that turns your space into a mix of cozy and slightly mysterious.
Why Elegant Spookiness is the Bomb:
These candle holders are like a style statement for your spooky Halloween decorations. The combo of delicate black lace and that pop of metallic paint brings together elegance and spookiness in a way that’s just too cool. When the candles do their thing, the lace shadows come alive, giving your place a moody, storybook vibe. It’s like Halloween dropped by for a chic hangout, and these candle holders are the VIP passes. So, with these in your setup, it’s not just about the usual jack-o’-lanterns; it’s about setting an atmosphere that’s all about embracing the vibes of the season – spooky, stylish, and totally you.
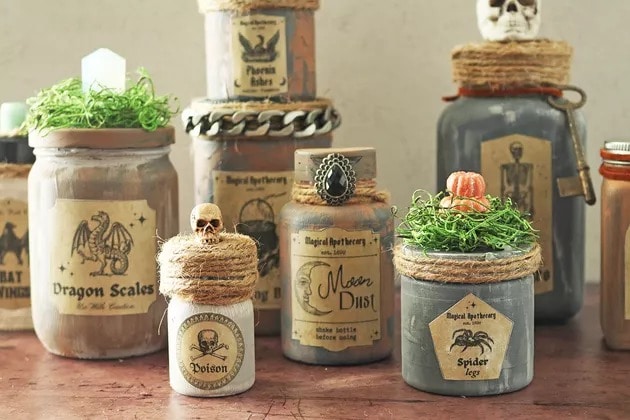
Witchy Potion Bottles and Apothecary Jars
Get ready to unleash your inner witch and cook up some seriously magical vibes with DIY potion bottles and apothecary jar spooky Halloween decorations. It’s like taking your Halloween decor to a whole new level of mystical coolness. Imagine having shelves decked out with bottles of mysterious stuff – it’s like stepping into a realm of spells and enchantments. Here’s the lowdown on how to whip up these spooky Halloween decorations that are part eerie, part enchanting.
Step 1: Round up your gear – clear glass bottles and jars (grab ’em from a craft store or thrift shop), label templates (Google’s your BFF), and spooky “ingredients” like colored liquids, little plastic critters, and anything that screams “witchy vibes.”
Step 2: Start by slapping those labels on. Think labels like “Bat Wing Extract,” “Dragon’s Breath,” or “Eye of Newt” – you know, the essentials for any potion master.
Step 3: Carefully stick the labels onto the bottles using glue or tape. Make ’em look like they’ve been hanging out in a mystical apothecary for ages.
Step 4: Time to add the spooky stuff. Pour in colored liquids – you can tint water with food coloring – and toss in those plastic bugs, eyeballs, or whatever floats your cauldron.
Step 5: Arrange your potion bottles and jars wherever the magic happens. Mantels, shelves, or even your dining table – mix and match heights and arrangements for that Insta-worthy setup.
Label and Filling Ideas:
- Zombie Brain Juice: Fill a jar with green-tinted water and toss in some squishy-looking plastic creatures.
- Witchy Elixir: Go classic with dark-colored liquid (like grape juice) and throw in some dry ice for that legit cauldron vibe.
- Unicorn Tears: Pop in some iridescent glitter and label it “Unicorn Tears” – it’s like a shimmering spell in a bottle.
These potion bottles and apothecary jars are more than just spooky Halloween decorations; they’re like your way of inviting magic into your space. The labels give ’em that touch of authenticity, while the creepy contents dial up the spooky factor. Stick ’em on your mantel for that witchy vibe, line your shelves with ’em for instant charm, or plop ’em right in the middle of your Halloween dinner setup for some epic conversation starters. With these spooky Halloween decorations, your Halloween digs are way beyond the usual stuff – they’re practically a ticket to your very own witchy world where every day is a bewitching adventure.
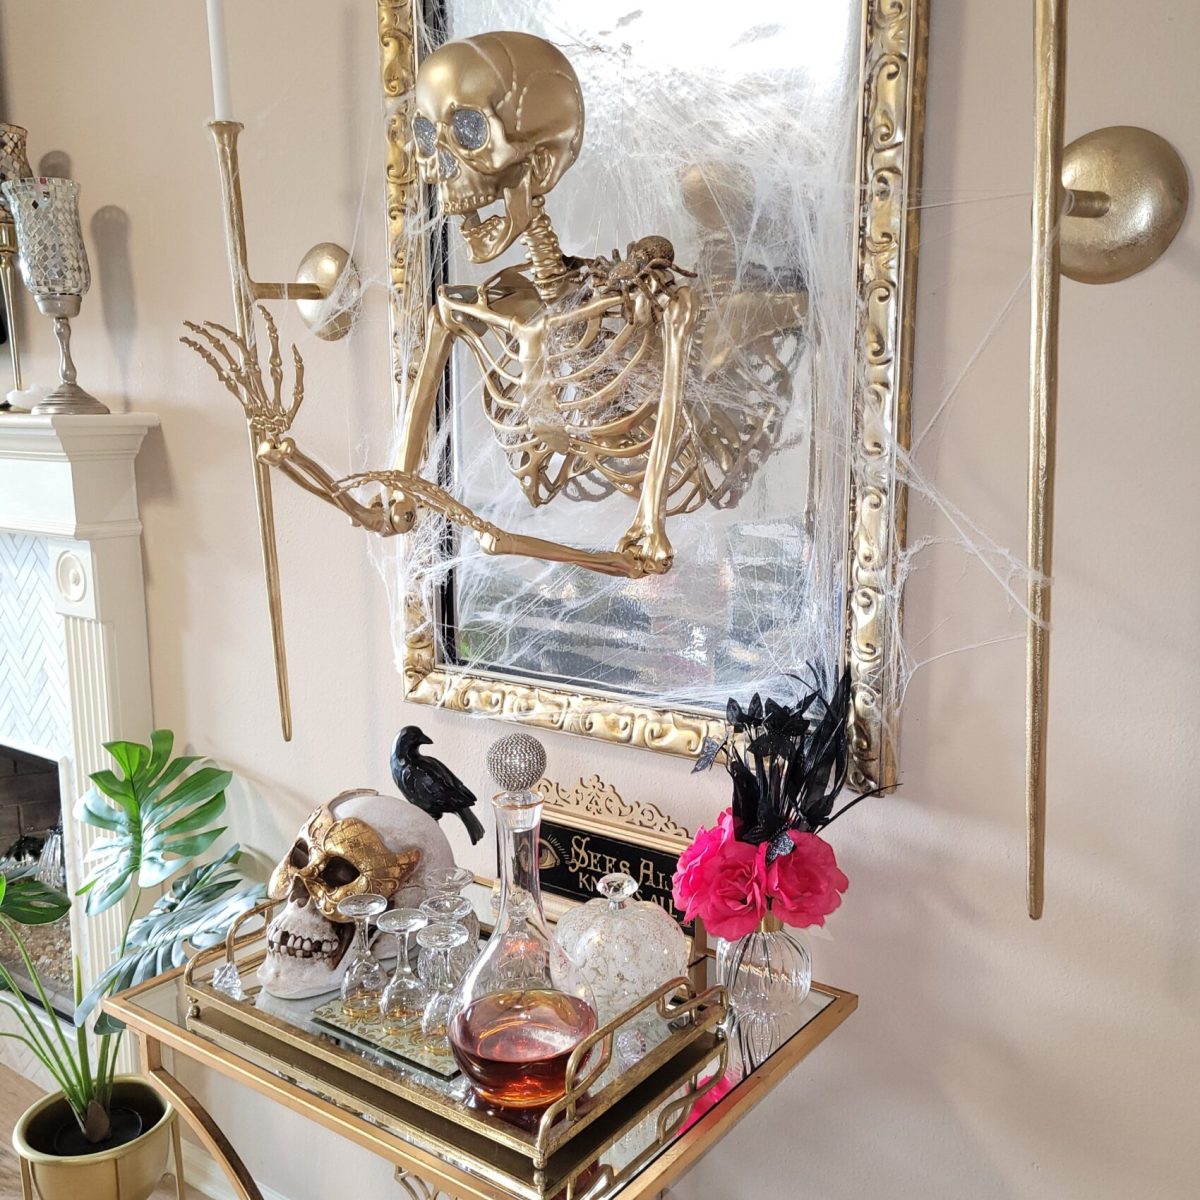
Spooky Mirror Makeover
Ready to take your mirror from basic to seriously epic? Let’s dive into the world of mirror magic and transform it into a spooky focal point that’s gonna have your space looking straight out of a Halloween movie. Here’s how you can pull off another one of these spooky Halloween decorations that’s all about turning your reflection into a spooky masterpiece.
Step 1: First things first, gather your tools – a regular mirror (the older, the cooler), some fake spiderwebs, and skull embellishments (hit up a craft store for these bad boys).
Step 2: Start by draping those fake spiderwebs all over the mirror frame. Let ’em hang down for that abandoned mansion vibe.
Step 3: Now, time to get artsy with the skeleton. Use double sided adhesive to stick that bad boy onto your mirror as if he’s “popping out” at you, almost as if he’s saying “Hey, I’m spooky, but I’m also kinda classy.”
Step 4: Kick it up a notch by adding more stuff if you’d like. Toss on some bats, perch tiny ravens on the frame, or create a mini Halloween scene at the bottom with fake pumpkins and candles.
Spooky Decor Ideas:
- Fancy Skulls: Classic skulls are rad, but go for metallic ones to level up the style.
- Creepy Crawlers: Add fake spiders for extra spook. Let ’em hang from the webs or crawl up the sides of the mirror.
- Mysterious Feathers: Tuck in some dark feathers for that touch of intrigue.
This mirror makeover is more than just a DIY project; it’s a way to throw in some unexpected flair to your spooky Halloween decorations. It’s like surprising your space with a twist that’ll have everyone doing a double-take. Picture your friends walking in and spotting a mirror decked out with webs, skulls, and all things eerie – it’s like they’ve stumbled into a whole new dimension where mirrors are gateways to a world of spooky awesomeness. So, grab that mirror, get creative with your spooky Halloween decorations, and get ready to up your Halloween game with a touch of eerie elegance that’s sure to impress your whole crew.
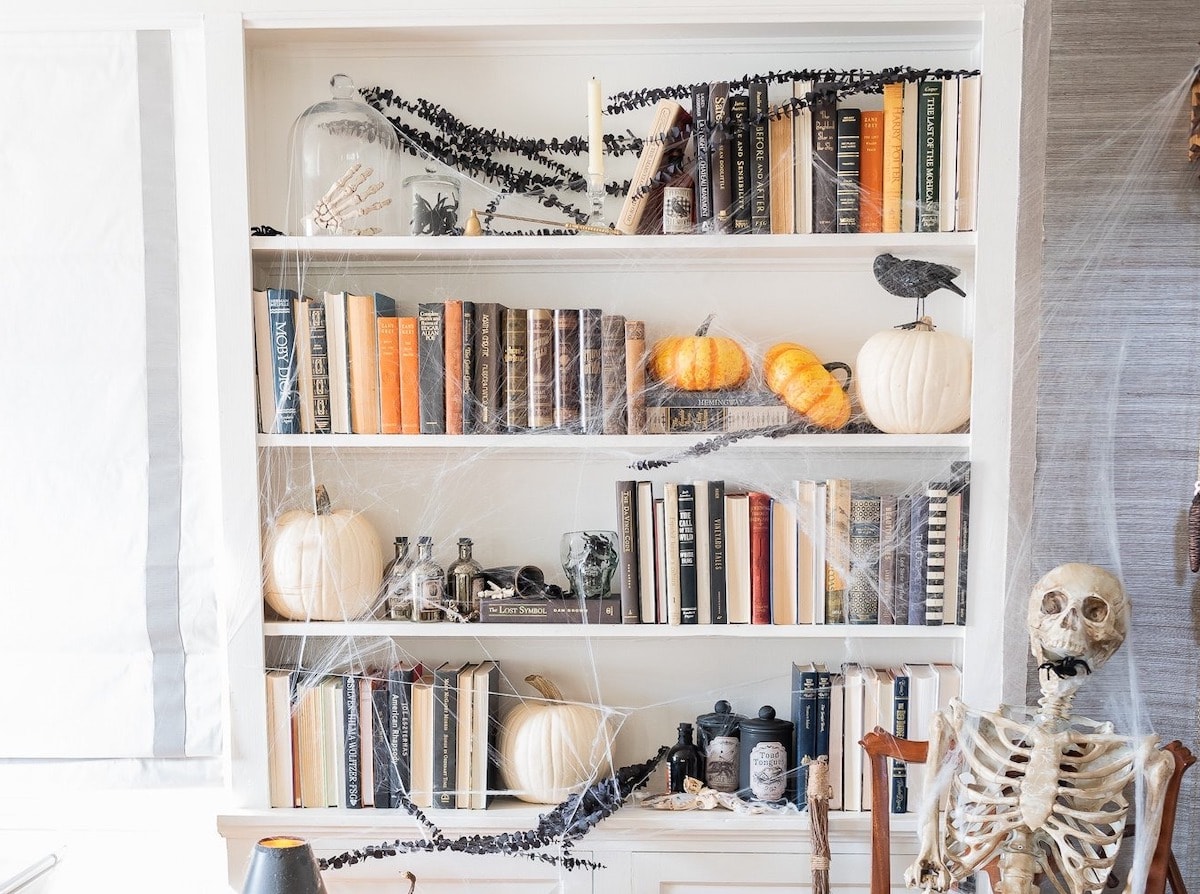
Enchanted Bookshelf Display
Time to level up your bookshelf game and turn it into a mystical hotspot that’s straight out of a fantasy novel. Let’s talk about giving those shelves an enchanted and eerie vibe that’ll have you feeling like you’re living in a magical world. Picture this: shelves that are basically a gateway to a realm of secrets and enchantments – it’s like bringing a touch of Hogwarts right into your space. Here’s how you can sprinkle some DIY magic to transform your bookshelf into a seriously cool and mysterious setup.
Step 1: Round up your stuff – grab your favorite books (they’re the heart of this setup), battery-operated candles (safety first, folks), potion bottles (you can find ’em at craft stores or recycle some old ones), and a bunch of spooky figurines to crank up the magic.
Step 2: Get those books in formation – mix and match sizes, genres, and maybe even go for a slightly haphazard look for that extra “I woke up like this” vibe.
Step 3: Set up the candles between the books. When those babies start flickering, they’ll create this cozy, slightly eerie glow that’s perfect for the ambiance.
Step 4: Time for the potion bottles – fill ’em up with colored liquids (try food coloring for that extra oomph) and toss in some glitter, beads, or even mini plastic creatures for that legit potion aesthetic.
Step 5: Seal the deal with the spooky figurines. Put ’em strategically, like they’re guardians of your magical domain, ready to cast spells at a moment’s notice.
Cool Setup Ideas:
- Floating Book Illusion: Hang books at different heights using fishing line. It’s like having a shelf full of spellbooks that are floating mid-air.
- Witchy Nook: Dedicate a whole section to your witchy pursuits – potion bottles, spellbooks, and maybe even a little cauldron figurine.
Turning your bookshelf into an enchanted and eerie hotspot is all about that DIY magic. It’s about mixing things you already have to create spooky Halloween decorations that are part whimsical, part mysterious, and completely you. When you step back and see your bookshelf transformed into this mystical universe, you’ll feel like you’ve stepped into a fantasy novel – a little corner where books and imagination collide to make your space an enchanting escape. So, grab your stuff, let your creativity loose, and watch as your bookshelf becomes a portal to your own magical realm, ready to enchant anyone who dares to enter.
Get Going on Those Spooky Halloween Decorations!
And that’s a wrap on our DIY spooky Halloween decorations! We’ve covered a ton of wicked ideas that’ll totally transform your space into a haunted wonderland. From those chic floating ghost vibes to the seriously cool mummy doorways, we’ve cracked the code on turning your place into a Halloween haven that screams “you.”
But hey, don’t stop there – let your inner artist go wild and tweak these ideas for spooky Halloween decorations to match your style. That’s the beauty of DIY – it’s all about making it uniquely yours.
Just think about it: each craft, each brushstroke, they’re all building blocks for memories that’ll stick around. It’s not just about using spooky Halloween decorations to deck out your space; it’s about the joy of creating something totally awesome with your own hands. So get those creative juices flowing, and let’s turn your space into a haunted masterpiece that’s basically a canvas for your imagination. With these spooky Halloween decorations, you’re not just crafting decor; you’re weaving stories and crafting memories that’ll be part of your Halloween tales for years to come. So go on, let’s make this Halloween epic!
WANT TO READ MORE?
Check out 9 Fun & Unique Halloween Party Decor Themes to put those DIY skills to the test!
CONNECT WITH DAILY MOM
💖 NEWSLETTER: DAILY READS IN YOUR INBOX 💖
Sign up to receive our picks for the best things to do, see and buy so you can relax and focus on more important tasks! Let us help you be the best version of yourself you can be!
BE SOCIAL WITH US
📌 LOVE IT? PIN IT!📌
